
Get Weekly Marketing Tips
Join 30,000+ marketers and get the best marketing tips every week in your inbox
SEO (Search Engine Optimisation) — pretty much every business with an online presence knows it’s an important part of online marketing, but most don’t understand it. And that’s okay, because SEO can be pretty impenetrable with plenty of jargon and technical elements. It can take years to learn properly, and when you’re running a business, you often don’t have that kind of spare time. That being said, there are some simple fixes that anyone can do that will boost your site’s SEO.
You will need some external tools to complete these checks, but all the tools used in this guide are free or have a free version. We’ll be making use of the Screaming Frog SEO Spider tool. The free version of this will crawl up to 500 pages on a site. If your website is larger, you will need to purchase a license, which allows you to run the tool on sites of any size. At only £150 a year, in my opinion, it’s well worth the investment, and there’s plenty of documentation online about how to use it for all sorts of weird and wonderful website tasks.
We’ll also be using the Yoast SEO plugin for WordPress. If you don’t have this installed on your site, go ahead and install it (always back up your site before installing a plugin, just in case it conflicts with an already installed plugin). Yoast is a simple and powerful SEO tool — and the free version is more than enough for what we’ll be using it for.
In this guide, I’ll be explaining how to make these fixes on a WordPress site, but don’t worry if you use a different CMS (Content Management System). The principles of these fixes hold true for any website, but I’d recommend referring to your CMS documentation to determine exactly how to implement them.
- SSL Certificate Implementation
- Implement Domain Redirects
- Fix Broken Pages
- Fix Broken Links (Internal and External)
- Use Permanent Redirects
- Check Your Metadata
- Check Your H1s
- Check Your Sitemap
- Links to HTTP pages and HTTP resources
- Check Your Noindex Tags
1.SSL Certificate Implementation
SSL (Secure Sockets Layer) encryption secures the information being passed between your server and the user’s browser. EVERY website in this day and age should have a valid SSL certificate. If you’re collecting any information via your website — names, email addresses, delivery addresses, etc. — then you MUST have an SSL certificate to effectively rank in the Search Engine Results Pages (SERPs). Even if you don’t collect any user information, I would strongly recommend getting an SSL certificate. Google prefers secure sites, so having one will increase your chance of ranking, while users like to see it too. If your site doesn’t have an SSL certificate, a user’s browser will warn visitors that any information they submit may not be secure — a real conversion killer.
If you’re unsure how to check if you already have a valid SSL certificate, it’s simple. Go to your website in any browser and check the address bar. If you see a padlock icon to the left of the URL and/or the address starts with “https”, you have a valid SSL certificate.

How a valid URL certificate looks on Google Chrome
If you can’t see either of these, you don’t have an SSL certificate and you will need to implement one. You will need to speak to your hosting provider (whichever company manages the server your website is hosted on) about adding one to your website. Any worthwhile website host will be able to implement this for you without any hassle — if they can’t, I strongly recommend looking for a new host. Also make sure that your certificate covers all subdomains you are using. For example, if your site has a news subdomain (news.mydomain.co.uk), this will need to be specifically named on the certificate — otherwise, it won’t be covered and will remain insecure.
If on WordPress, remember to update your “WordPress Address (URL)” and “Site Address (URL)” to HTTPS by going into Settings > General.
2. Implement Domain Redirects
Well over half of all the websites I’ve ever worked on had missing domain redirects, and this can make a big difference to your site’s ranking. Every website exists in multiple states according to how its URLs are crafted. At a minimum, without an SSL certificate (see above, you really should have one!), there will be two versions of a site, for example, http://mydomain.co.uk, and http://www.mydomain.co.uk. With an SSL certificate, there will be four: two HTTP URLs and two HTTPS URLs — https://mydomain.co.uk and https://www.mydomain.co.uk. Multiple versions of each page can confuse search engines, causing them to not know which page they should rank. At best, you will be splitting your site’s authority between different versions; at worst, a search engine may not be able to determine which page to rank and may, therefore, choose not to rank any.
To check domain redirects on your site, visit each of the four different addresses. What you are looking for is that three of them redirect you to the fourth. If that happens, your site is set up correctly. If it doesn’t, you will need to implement domain redirects to indicate the primary version of your site to search engines.
*To implement these, you will need to edit the htaccess file of your site, so ALWAYS back up your site before making any changes, as a mistake could knock your site offline.
The first step when implementing domain redirects is to determine which version of your site you want to be the primary version. If you have an SSL certificate installed (if you didn’t already catch on, then seriously, you should), this should ALWAYS be an HTTPS version. But whether you want the primary version to include the “www.” or not is a personal choice, so simply decide which you want to be the main version. Once you’ve made the decision, you’ll need to complete two steps.
Forcing www. or Not
To force visitors to your site to always use www. — or not, as the case may be — you will need to change your WordPress settings.
- Log in to your WordPress admin page.
- Navigate to Settings > General.
- Under “WordPress Address (URL)” and “Site Address (URL)”, check the addresses. If you want to include www. in your URLs, make sure it appears in both addresses here. If you don’t, leave it out.
- Save your settings.
Forcing HTTPS
To force visitors to your site to always use HTTPS, you will need to add some code to the htaccess file (back up your site before doing this).
- Log in to your WordPress admin page.
- Navigate to Yoast > Tools > File Editor.
- Navigate to the .htaccess section.
- Find where it says “RewriteEngine On” and add the last two lines of the following code (copy from “RewriteCond” onwards):
RewriteEngine On

RewriteCond %{HTTPS} off

RewriteRule ^(.*)$ https://%{HTTP_HOST}%{REQUEST_URI} [L,R=301] - If you can’t find “RewriteEngine On”, add the entire code to the top of your htaccess file.
- Save your settings.
3. Fix 404 Pages
A 404 page is one that returns a 404 error code when a user tries to access it. A 404 error means that the page doesn’t exist, and driving visitors to such pages provides a poor user experience. Fixing them is relatively simple, but first, you need to identify any 404 pages on your site. There are two ways to do this using free tools, and I’d recommend you use both.
Using Screaming Frog
- Open Screaming Frog, enter your site’s domain name (don’t include http(s) or www. — for example, https://exposureninja.com/ would simply be exposureninja.com) and start the crawl.
- Once complete, check the Status Code column using the Internal tab (you can sort via this column to make life easier).
- Look for any page with a status code of 404 and make a note of these URLs.

Using Google Search Console
If you are not already using Google Search Console, you really should be. Check out this great article on Yoast to find out why and how to get started.
- Log in to Search Console and select your website property.
- Navigate to Coverage.
- If Google has detected any 404 pages on your site, you’ll see a summary in the table on this page (along with any other errors Google has found).
- Click on the “Submitted URL not found (404)” entry to see details of these pages.
- Make a note of any URLs.
How to Fix 404s
The exact fix for any 404 page will depend on why the page no longer exists.
If the page should exist
You will need to determine why it no longer exists (it may have been accidentally deleted or set to draft status), and restore the page.
If the page shouldn’t exist
If the page has been deleted for a reason and it’s right that it is no longer available — maybe it’s an obsolete product or service, or two services have been consolidated into one — the page will need to be redirected. This can be done easily on WordPress using a plugin. My preference is Redirection, but there are plenty of other plugins available that handle redirects.
Remember to back up your site before installing any plugins. Then:
- Log in to your WordPress admin page.
- Navigate to Tools > Redirection (or whichever redirection plugin you are using).
- Enter the “Source URL” (the URL to be redirected) and the “Target URL” (the URL you want to redirect users to).
- Click “Add Redirect”.
Don’t redirect all your pages to one page on your site (such as your homepage). Each 404 page should be redirected to the most similar live page.
Request a free website and marketing review and our team will tell you how to improve your marketing.Is your marketing underperforming?
![]()


4. Fix Broken Links
Most of your broken links will have been fixed using the 404 method above. However, you may still have some broken external links remaining. We’ll be using Screaming Frog to check for these.
- Open Screaming Frog, enter your site’s domain name (again, don’t include http(s) or www.), and start the crawl.
- Once complete, navigate to the Response Codes tab and click on Client Error (4xx) in the menu on the right-hand side.
- You will now have a list of all pages your site links to that return a 4xx error (if you’ve followed the steps above to fix 404 pages, these should all be external pages).
- Click on a link in the table and select the Inlinks tab at the bottom. This will now tell you which of your pages are linking to the broken page.
- If there is a 404 error, either remove the link from your page or update it to link to a live page.
- If there is a 403 error, check the page being linked to. If it works, no action is needed. If it doesn’t work, either remove the link or update it to point to a live page.
Note: If you see a lot of internal pages with 500 errors in the Response Codes tab in Screaming Frog, this means your server is failing to provide the page information to the crawler. If this is an issue for Screaming Frog, it will likely be an issue for Google as well. Speak to your hosting provider about improving your server.
5. Use Permanent Redirects
This is another issue I see on a lot of sites — “I’ve put a redirect on my page. The redirect works, but the replacement page just doesn’t rank at all.” Nine times out of ten, this is because the wrong type of redirect has been used.
There are two main types of redirects: 301 permanent redirects, and 302 or 307 temporary redirects. There are other types of redirects, but these will be the main ones you see and use. A 301 redirect tells web crawlers that the change is permanent, allowing the crawler to transfer page authority and swap the page within its index. 302/307 redirects tell a crawler that the redirect is only a temporary change, so it will leave the original page in its index and won’t pass any page authority through the redirect. You can add permanent redirects in the following way:
- Open Screaming Frog, enter your site’s domain name (don’t include http(s) or www.) and start the crawl.
- Once this is complete, navigate to the Response Codes tab and click on Redirection (3xx) in the right-hand menu.
- You will now have a list of all pages being redirected. Sort the URLs so you can group all your internal pages. This list will include redirected external pages you are linking to — we don’t need to worry about these.
- Check for any instances of 302 redirects. If you find any, check the page to determine if it’s meant to be a temporary change.
- If it is not a temporary change, replace the 302 (temporary) redirect with a 301 (permanent) redirect. You can use the redirection plugin for WordPress and follow the instructions in the “How to Fix 404s” section, but make sure you delete the old redirect before adding the new.

6. Check Your Metadata
Metadata is the information Google and other search engines display to users when they conduct a search. Metadata often gets overlooked, but it’s one of the simplest and easiest fixes you can make. You will likely already have metadata on your site. Most CMSs will auto-populate metadata, but if it’s left blank, Google will use the content on the page. However, neither of these will provide the benefits of having uniquely crafted metadata for your pages.
To check the metadata on your site, you can use Screaming Frog.
- Open Screaming Frog, enter your site’s domain name (don’t include http(s) or www.) and start the crawl.
- Once complete, there are multiple places you can see the metadata for your pages:
- In the Internal tab, where there is a Title 1 column (page/meta title) and a Meta Description 1 column.
- In the Page Titles tab (which lists all page/meta titles).
- In the Meta Description tab, which lists all meta descriptions.

I won’t go into detail here on writing metadata — that’s a whole article in itself — but there are plenty of guides available on our website showing you how to write effective metadata.
Once you’ve written your awesome new metadata, you’ll need to upload it to your site.
- Log in to your WordPress admin page.
- Navigate to the page you want to add the metadata to.
- Scroll down until you find the Yoast section.
- Copy your title into the SEO Title box.
- Copy your description into the Meta Description box.
- Save the page.
Handy tip for WordPress users: Log in to your WordPress admin page, and in another tab in the same browser, enter the URL of the page you want to edit. When it loads, you’ll see a WordPress menu bar at the top of the page, click “Edit Page/Post” and it will directly take you to the WordPress page, where you can edit your metadata. This is a great time-saving trick for large websites with hundreds of pages!
7. Check Your H1s
An H1 is a type of heading tag used in the page content. H1 — as the name suggests — is the first heading and serves as a page title (not to be confused with the meta/page title, which is what search engines display to users).
Many sites use H1s as formatting devices to make text larger or bold, but this is bad practice. Each page should have only one H1 — any other headings should use H2, H3, H4, and so on. To check how many H1s appear on a page, we’re again going to use Screaming Frog.
- Open Screaming Frog, enter your site’s domain name (don’t include http(s) or www.) and start the crawl.
- Once complete, navigate to the H1 tab and sort the data using the Occurrences column.
- Make a note of any pages that have more than one H1.
- Determine which should be your primary heading. This should preferably appear at the top of the page and include a target keyword.
- Reformat the other H1s on the page to H2, H3, etc. Make sure you follow the hierarchy here; don’t have your H1 page title followed by headings formatted as H3.

8. Check Your Sitemap
There are two types of sitemap: an XML sitemap and an HTML sitemap. XML sitemaps are used by crawlers such as Google to understand the pages available on your site. HTML sitemaps are pages available to users that explain your site structure.
Personally, I am not a fan of HTML sitemaps. They provide no SEO benefit, as crawlers don’t use them, and if you need one for users to navigate your site properly, then your site structure is too complicated and you should consider redesigning it. XML sitemaps, on the other hand, provide SEO benefits by helping crawlers understand your site structure and making them aware of all the pages on your site.
First things first, check that your site has a sitemap by navigating to mydomain.co.uk/sitemap.xml (or otherwise, mydomain.co.uk/sitemap_index.xml). If you get a 404 on both of these links, you probably don’t have a sitemap and you’ll need your webmaster to create one for you. Alternatively, if you are on WordPress, you can use Yoast to create one. If you do get a page — congratulations — you have a sitemap! Don’t worry if it doesn’t look like your other website pages — it’s not supposed to.
See below for an example of what a sitemap generated by Yoast looks like. It’s likely that yours will look similar:

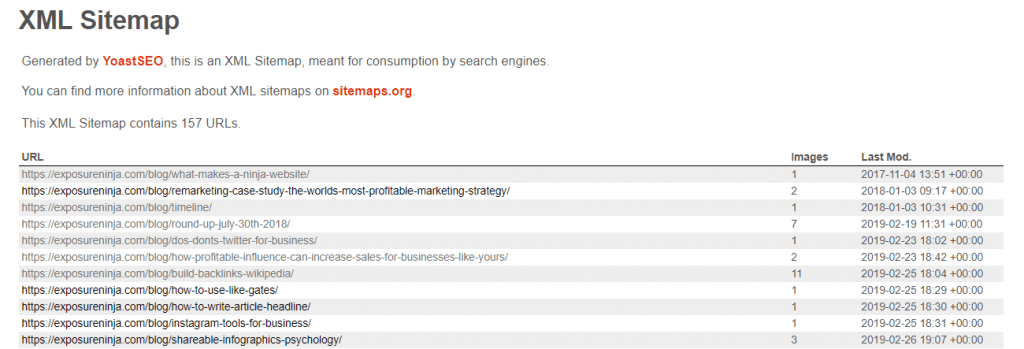
But what if you need to create a sitemap yourself? Here’s how to do it using Yoast.
- Log in to your WordPress admin page.
- Navigate to Yoast > General > Features.
- Find XML sitemaps and click “on”.
- Save your changes.

9. Links to HTTP Pages and HTTP Resources
If your site is secure, you need to make sure all its elements are as well. Site owners often add an SSL certificate to their site and think the job’s done, but if you haven’t updated your internal links to point to the new HTTPS versions of pages, and you haven’t updated any resources (such as images) on your page(s) to the HTTPS versions, you’ll still encounter problems and users will still see security warnings from their browsers.
Links
If your site still links to old HTTP (non-secure) versions of pages, search engines may be confused about which pages to rank. Via your sitemap, you are essentially telling a crawler that the secure page is the main one you want it to use, yet your internal links still point to the non-secure page. If you’ve implemented the forced redirect to HTTPS I mentioned earlier, this will help, but it’s still best practice to update the links individually.
Luckily, fixing these links is an easy process. First, you need to find any links that may be affected:
- Open Screaming Frog, enter your site’s domain name (don’t include http(s) or www.) and start the crawl.
- Once complete, navigate to the Internal tab and sort the data by URL. Look for any URL that starts with “http://”.
- If you have any pages starting with HTTP (you should at least see the homepage), click on the URL and the Inlinks tab.
- Here, you’ll see all pages linking to the HTTP version of the page. If this is blank, that’s fine, and this simply means that no pages are linking to the HTTP version but that the crawler found it through the forced HTTPS redirects.

You’ll now need to update the links.
If you have a developer:
If you have a developer on your team, they will be able to easily update the links through find and replace. Find all mentions of “<a href=”http://mydomain.co.uk”, and replace with “<a href=”https://mydomain.co.uk”. For those unfamiliar, “<a href=” is HTML code that signals that text is a link.
If you don’t have a developer:
If you don’t have a developer on standby, you’ll need to update the links manually.
- Log in to your WordPress admin page.
- Navigate to the page you want to update the link on.
- Locate the link and update the linked HTTP page to the HTTPS version.
Resources
Insecure resources are images or forms on your site that are being delivered from an HTTP source. Because this element isn’t secure, your page won’t be secure, either, so you’ll need to update it. First, we need to find these elements, and we’ll once again be using Screaming Frog.
- Open Screaming Frog, enter your site’s domain name (don’t include http(s) or www.) and start the crawl.
- Once the crawl is complete, click Reports at the top and select Insecure Content.
- This will allow you to export a .csv file with the data. Save that file and open it as a spreadsheet.
- Using the exported data, identify any insecure content on your site, navigate to the relevant page within your CMS and update the content to point to the secure resource.
Request a free website and marketing review and our team will tell you how to improve your marketing.Is your marketing underperforming?
![]()
10. Check Your Noindex Tags
Noindex tags are HTML tags that exist on your site and tell search engine crawlers that a page shouldn’t be indexed by a search engine. While it’s quite rare for pages to be no-indexed accidentally, it’s not unheard of. I’ve seen entire sites no-indexed in the past, so it’s worth checking.
- Open Screaming Frog, enter your site’s domain name (don’t include http(s) or www.) and start the crawl.
- Once complete, navigate to the Internal tab and sort the data using the Indexability Status column.
- For any page with a value of “noindex”, check the URL and make a note of any pages that are currently noindexed but SHOULD appear in the search results.
Once you have these, you will need to remove the noindex tag on the page.
- Log in to your WordPress admin page.
- Navigate to the page you want to update.
- Scroll down to the Yoast section and click on the Advanced options (gear icon).
- Under “Allow search engines to show this Page in search results?”, select “Yes” from the drop-down menu.
- Save the page.
Bonus Tip
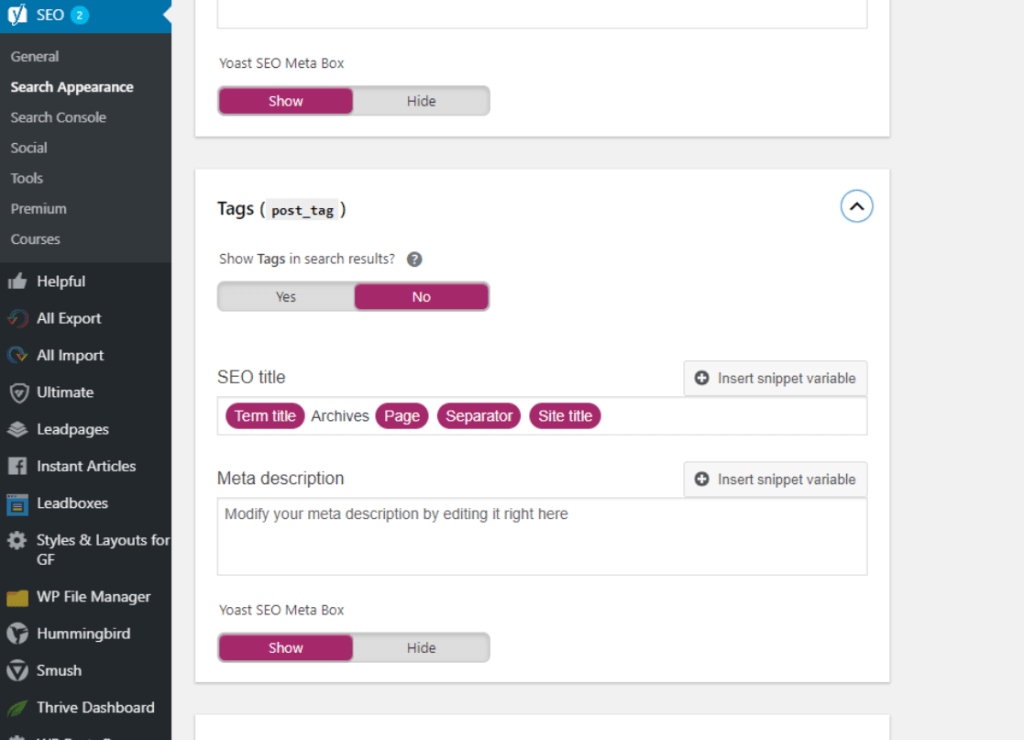
You may have several pages that you want to noindex, such as a blog archive, to avoid duplicate content. You can noindex sections of your site quickly and easily using Yoast.
- Log in to your WordPress admin page.
- Navigate to Yoast > Search Appearance.
- Using the tabs at the top, locate the content group you want to remove.
- Change the “Show site section in search results?” option to “No” and all pages within that group will be no-indexed — unless you override the setting on the page itself.
And that’s it — 10 simple fixes that you can implement yourself to help boost your site’s SEO. Implementing these can improve your site health and visibility, so it’s definitely worth the effort. If you’ve done these and are hungry for more, check out our other great guides on SEO and Content Marketing. And while you’re at it, why not submit your site for a FREE review from our expert team? We’ll show you exactly what you can do with a Ninja in your corner.