Contents

- What is Search Engine Optimisation?
- Can You Do SEO on Shopify?
- How to Do Shopify SEO
- SEO Apps for Shopify
- On-page Shopify SEO
- How to Do Keyword Research for Shopify
- Page Titles and Meta Descriptions in Shopify
- How to Add Header Tags to Shopify
- Image Optimisation in Shopify
- Shopify Store Site Structure
- Shopify Product Page SEO
- Shopify Blog
- Content Writing
- How to do Technical Shopify SEO
- Optimise Your Shopify Store for Mobile
- Test Your Shopify Store's Speed
- Structured Data in Shopify
- Duplicate Content in Shopify
- Submit Your Sitemap to Google
- Set Up URL Redirects in Shopify
- Edit the Robots.txt File in Shopify
- Off-site Shopify SEO
- Link Building for Shopify
- Social Media
- Should I Hire a Shopify SEO Agency?

Get Weekly Marketing Tips
Join 30,000+ marketers and get the best marketing tips every week in your inbox
Shopify is one of the biggest eCommerce platforms in the world, with nearly 4 million eCommerce sites built on the platform. Since 2020 the number of Shopify stores has grown by over 200%, meaning that getting your eCommerce store in front of potential customers is becoming a challenge.
Today, we’ll explain how to get your Shopify store to the top of Google using search engine optimisation, or SEO.
If you’re familiar with SEO, keep reading, as there are some Shopify-specific changes you can make to help you climb higher in the Google results.
So, why should you listen to us?
We’ve taken eCommerce store clients from five to eight figures in annual revenue, so we know a thing or two about optimising an eCommerce store for SEO.
Our expert SEO Specialists understand the complexities of the Shopify eCommerce system (including the Shopify 2.0 changes) and how to get the most from the platform.
Please note: the screenshots included in this article may not exactly match your Shopify store, depending on the theme you use, whether or not you use a page editor if you have Yoast installed and more.
We’ll start by explaining what SEO is for those who are completely new. If you already know about SEO, click here to skip to the next section.
What is Search Engine Optimisation?
Search engine optimisation, or SEO, is an element of digital marketing used to improve where you appear in Google searches. Improving your SEO results in “free” organic traffic from search engines. The only cost is your time.
SEO practices have evolved over the years. Today, the most common elements of SEO are:
- Keyword research
- Keyword-optimised website content
- Local SEO
- Improving your website’s user experience
- Link building.
There are over 200 different ranking signals that Google uses to decide which websites should rank higher on Google and which rank lower. Google’s algorithm is updated regularly to ensure users get the best experience.
Gone are the days of lazy content stuffed with keywords. You need to create a Shopify store that people want to visit again and again.
SEO takes several months to work, so don’t expect immediate results. It takes time but is well worth it.
Thinking of Moving Your eCommerce Store to Shopify?
Check out our guides on:
- How to Migrate BigCommerce to Shopify
- How to Migrate Magento (Adobe Commerce) to Shopify
- How to Migrate a WooCommerce Store to Shopify.
Or talk to our expert website development team for help moving your store to Shopify.
Can You Do SEO on Shopify?
This is a question we are asked a lot.
“Is Shopify bad for SEO?”
Shopify used to be bad for SEO, but not anymore.
Historically, SEO was one of the compromises store owners made for Shopify’s simplicity. To simplify Shopify, they removed lots of functionality you might get on a platform like WordPress and WooCommerce.
This made the platform easier to use, but SEO experts couldn’t do as much optimisation for stores hosted on Shopify.
Recently Shopify has improved SEO opportunities for their stores. There are still SEO limitations, but the simplicity of Shopify and its functionality makes up for that.
If you’re hosting your eCommerce store on Shopify but want a more bespoke website, WooCommerce might be for you. Check out our guide on migrating from Shopify to WooCommerce.
Is your marketing underperforming?
Request a free website and marketing review and our team will tell you how to improve your marketing.


How to Do Shopify SEO

Shopify SEO follows many SEO practices that apply to all types of websites across the internet.
We’ve put together a list of the best on-page and technical SEO changes you can make to help your store rank on Google and how to make these changes on Shopify.
This guide covers:
- SEO Apps for Shopify
- On-page Shopify SEO
- Technical Shopify SEO
- Off-site Shopify SEO.
SEO Apps for Shopify
You may want to use an app to help with your SEO. There are many SEO apps on the Shopify app store, some free and some paid. Most of the paid apps offer free trials, so you can test them before you commit.
One of our favourites is the Yoast SEO app. Yoast offers tips to help you optimise individual pages and blog posts. As with any SEO app, Yoast should be used as a guide and not as strict rules you must follow. Don’t sacrifice the quality of your website content to tick all Yoast’s boxes.
We also suggest installing a Google Shopping app. This will help you easily list your products on Google Shopping, making them more likely to appear in the shopping section of the search results.

Don’t forget to delete any apps you decide not to use. Each app adds new code to your website, which could make your website slow down. If you don’t use it, lose it.
On-page Shopify SEO

Each page of your Shopify store needs to be optimised for search. There are multiple ways you can do this on your product pages, collections, blog, and homepage.
Before making changes to your Shopify store, you first need to decide which keywords and phrases you want your store to rank for. You can find these keywords by conducting keyword research.
How to Do Keyword Research for Shopify
Keyword research is the best place to start in any Shopify SEO strategy.
It’s vital to target keywords related to your products and search terms potential customers use to look for products like yours.
Keyword research is easy once you know how. If you stick to these steps, you can’t go wrong.
Step 1. Make a list of topics related to your business. If you sell beauty products, you already have a keyword to start with — “beauty products”.
You can then expand on this, depending on your brand. If you sell organic beauty products, then you can add “organic beauty products” to your keyword list.
You may also come up with some keywords with different search intent. This varies depending on where the customer is in their journey.
“Buy organic make-up” shows purchase intent — they’re ready to buy.
“Top five organic eyeshadow brands” shows commercial intent — they’re comparing products similar to yours.
“What is different about organic beauty products?” shows informational intent — they want to learn more about products similar to yours.
It’s tempting to only focus on purchase-intent keywords, but most of your Shopify store’s traffic will come through informational searches. How you handle those search queries will improve your chances of converting that visitor into a customer.
Step 2. Find keywords your site is already ranking for. You can use a tool such as SEMrush* to see which terms your store ranks for.
This will give you an idea of the searches people make before landing on your site.
Note: you can filter your organic keywords to see the types of questions searchers ask when they land on your website. We filtered by informational keywords for this search and excluded the brand name “ethique”.
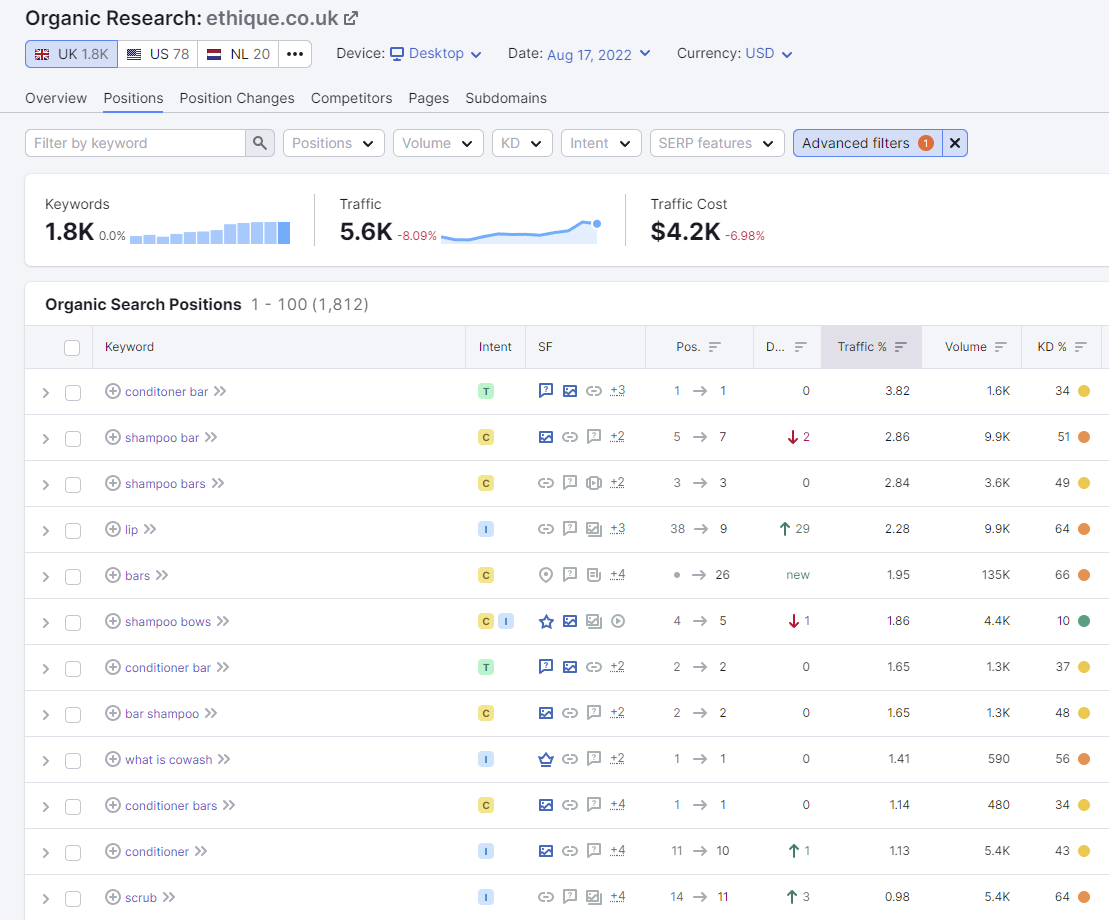
Screenshot of informational intent keywords that Ethique is ranking for.
Step 3. Find keywords your competitors are ranking for. You can do this using the same tool to see the keywords your Shopify store is ranking for.
Input your competitor’s website URL, and the tool will bring up a list of keywords your competitor is ranking for, and the pages that are ranking for those keywords. Your competitors don’t need a Shopify website — any website will work.
Pay close attention to the type of content that is ranking — if lots of product pages are ranking, you’ll want to optimise a product page for that keyword. If there are lots of blogs you’ll want to optimise a blog for that keyword.
Which Keywords Should I Focus On?
While conducting your keyword research, note how many searches that keyword gets per month. If it gets millions of searches per month, it will be very challenging to rank for. If it only gets 10 searches per month, it’s unlikely to earn you many sales.
We suggest targeting keywords with at least 100 monthly searches and no more than 10,000 monthly searches. Once your store is more established, you’ll be able to go after those higher-volume keywords.
That said, tools are just that, tools. They don’t always tell the full story. If you know that your audience is Googling a “0 search volume” keyword or phrase, then you should create content to target those searchers.
One you’ve prioritised your keywords, you can use this to plan a content marketing strategy.
The above is a simple overview of keyword research. Learn more about keyword research in our guide, “How to Do Keyword Research like a Pro“.
Page Titles and Meta Descriptions in Shopify
Page titles and meta descriptions are two pieces of HTML code that you should find on every page of the internet. These two pieces of data then appear in Google search when your website shows up as a search result.

The page title also appears on the tab in which you have that page open.

To write good page titles and meta descriptions, you need to:
- Make them unique
- Ensure they’re the right length
- Use accurate keywords and phrases for each page
- Include your unique selling point
- Write for people, not just for search ranking.
Regarding lengths, page titles should be longer than 30 characters but shorter than 60 characters. Meta descriptions should be longer than 70 characters and shorter than 130 characters.
Shopify allows you to write up to 70 characters for titles and 320 characters in your description, but going over the recommended limits will result in Google cutting your title and description short in search results.

How to Add Page Titles and Meta Descriptions to Shopify
Adding metadata to your Shopify store is straightforward.
To add metadata to an individual page, follow these steps:
Step 1. Head to the “search engine listing preview” section in your Shopify store, and click “edit website SEO”.
Step 2. Enter your page title in the “page title” field. This should include the keyword you want to optimise this page for. It’s best to have the keyword close to the front of the title, but only do this if the title makes sense with the keyword at the front.
Step 3. Enter your meta description in the “description” field. Meta descriptions are used to entice visitors to click on your website. They should be accurate and include your USPs. Google doesn’t always use the meta description you enter and instead will pull text from the page itself.
Once you click save, the metadata will be added to your page.

To add metadata to your homepage, follow these steps:
Step 1. Head to your Shopify admin page, find “online store” and then “preferences”.
Step 2. Enter your title and meta description
Click save to add the metadata to your store.

How to Add Header Tags to Shopify
Header tags are used to vary the size of headings on your pages.
- H1 is the largest and should only be used once on your pages.
- H2 is most often used for main headings throughout your content.
- H3 is used for subheadings.
Not only does using headers in your content give users a better experience, it also helps Google understand what your page is about.
You can see our use of headings throughout this guide.

To add an H1 tag to pages on your Shopify store, follow these steps:
Step 1. Select the page (product, collection, webpage or blog post) that you want to edit.
Step 2. Enter your title in the “title/heading” field, using best practices from the meta title section.
Step 3. Hit save, and your H1 title has been added.

You can add headings from H2 to H6 to your content using the Rich Text Editor in Shopify 1.0 or the Language Editor in Theme Editor in Shopify 2.0.
Image Optimisation in Shopify
There are two ways you can optimise your images for SEO.
The first way is to include your target keyword in the image’s file name. This keyword will depend on the page you’re adding it to.
If you’re writing a blog covering summer fashion trends, you should include “summer fashion trends” in the image file name, followed by the name of the item in the image, for example, “summer fashion trends crop top”.
The final file name would look something like this:
summer-fashion-trends-crop-top.png
It’s best to do this before you upload your images, as changing them once they’ve been uploaded to Shopify is difficult.
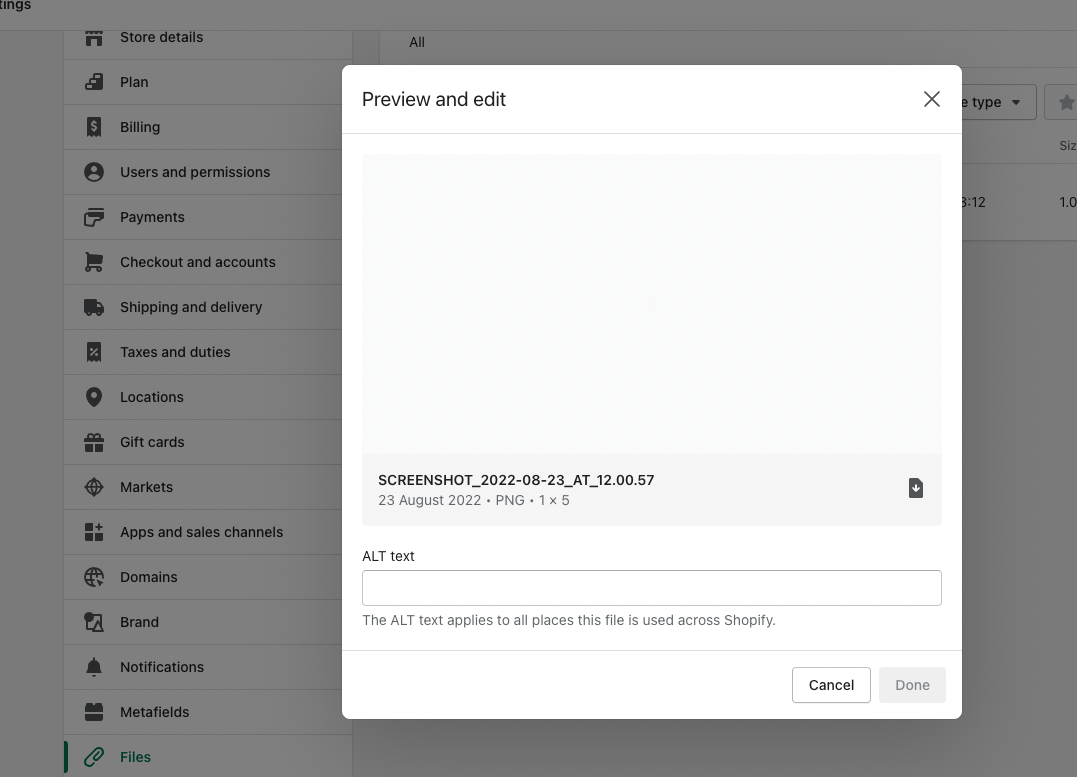
You should also add alt (alternative) text to your images. The main purpose of alt text is to ensure assistive technology can describe an image to visually impaired users. It also appears instead of the image if the image doesn’t load. Alongside this, alt text can also give your website an SEO boost.
The way you add alt text to your images differs depending on whether you are using Shopify 1.0 or Shopify 2.0.
Is your marketing underperforming?
Request a free website and marketing review and our team will tell you how to improve your marketing.
How to add alt text to images in Shopify 1.0
To add alt text to images on your pages or posts:
Navigate to the page or post that contains the image you want to add alt text to via the “Online Store” page.
- Find the image and double-click on it
- Add your alt text into the “image alt text” box
- Save by clicking “edit image”.
To add alt text to product images:
- Find the product you want to add alt text to and click on the image
- Click “Add alt text” and add your alt text to the product image.
How to add alt text to images in Shopify 2.0
If you use the drag-and-drop editor in Shopify 2.0, the process is slightly different.
- Head to “Online Store”, “Themes”, “Customise.”
- Navigate to your page template
- Select the image you want to add alt text to from the list of elements on the left-hand side
- Click “Add alt text” to add new alt text, or “Edit alt text” to edit existing alt text.

Got lots of images uploaded to your website already? There are Shopify apps that allow you to update your images in bulk, such as Bulk Image Edit. You can also upload your alt text as a CSV file.
Shopify Store Site Structure
Your site structure is how the pages on your Shopify store link to one another.
Site structure is important for SEO as it helps Google understand which pages of your website are the most important and which pages relate to one another.
Not only does it help with SEO, it’s also important for the user experience. Visitors to your store want to quickly find what they are looking for, without needing to hunt for it.
The most simple eCommerce website structure is homepage > category page > product page.
If you have subcategories, it would be homepage > category page > subcategory page > product page.
The homepage will lead to other places, too, such as your blog and contact details.

What are Shopify Collections?
Before we jump into creating a site structure, we need to discuss Shopify collections.
Collections are essentially product categories in Shopify, used to group products together. This makes it easier for visitors to find products and helps Google understand which products are related to each other.
Note: Shopify collections look different depending on the theme you use for your Shopify store.
Including links to each collection in your Shopify store’s navigation makes them easy for customers to find.
Here’s an example of the navigation bar on the Kylie Cosmetics Shopify store.
When you hover over “Shop Cosmetics”, a drop-down menu appears where you can click through to various collections, including “lip kits” and “lip liners”.

Site navigation on Kylie Cosmetics.
To create, edit or view collections, visit your “Shopify Admin” page and select “Collections”.
There are two ways you can set up collections in Shopify — automated collections or manual collections.
Automated collections create a collection automatically based on different selection conditions you enter. When you add new products that match these conditions, they are automatically added to these collections. To use automated collections, your products must be tagged correctly.
Learn how to set up automated collections.
Manual collections are made up of products you add manually. These collections always contain the same products unless you add or remove them yourself.
These collections take longer to set up but are suitable for smaller collections, such as products that are on sale for a short time.
Learn how to set up manual collections.
How to Create a Site Structure
Step 1. Remove Old Content
If you’re improving an existing Shopify store, start by removing any old content. This could be products that you no longer sell or empty collections.
Note: We recommend setting up a URL redirect from any removed pages, directing visitors towards a similar page.
Step 2. Plan Your Collections
Before you change your site structure, you want to plan your collections.
Start by considering which products go together and what category these products fall under.
Once you’ve planned a few collections, choose which products will go into each collection.
If you find one collection has too many products consider splitting it into smaller collections.
Here’s an example of Gymshark’s Shopify collections.
Under the “Women’s” shop page, they have multiple collections, including “New Releases”, “Crop Tops”, “Functional Fitness” and more.

Gymshark’s website navigation.
Visitors to the website know that they can find crop tops in the “Crop Tops” collection, and Google will have a better understanding of the products included on this page, potentially serving it to searchers looking for fitness crop tops.
Step 3. Add Internal Links
Internal links are links from one page of your website to another page on your website. This helps Google understand which pages are related to one another and helps visitors navigate your site.
We also suggest adding a recommended products section to your Shopify product pages. The products in the recommended section are automatically generated based on products that customers often buy together, have similar product descriptions or are in related collections.
Learn how to add recommended products to Shopify.
Is your marketing underperforming?
Request a free website and marketing review and our team will tell you how to improve your marketing.
Shopify Product Page SEO
When you add new products to Shopify, you should follow SEO best practices.
- Use a descriptive title. If you are selling a coffee maker called “The Deluxe”, don’t only include that in your title. A better title would be “The Deluxe – All-in-One at Home Coffee Machine”.
- Make your description interesting. Shopify allows you to format your product descriptions, so use bold, italics and bullet points (sparingly) to keep viewers interested. Include your keywords in a natural way in your product description. If you’re a product reseller, don’t just take the manufacturer’s description or copy someone else’s. You want your content to be unique to search engines to give it a chance to rank higher than the same products on other websites.
- Add media to your product pages. Use images and videos to give visitors a good view of the product. Before adding your product images to Shopify give them a name that includes your keyword. Add alt text to your product images once you’ve uploaded them to Shopify.
- Check the search engine listing preview by clicking “edit website SEO”. Add your page title and meta description.
Learn how to add products to Shopify.
Shopify Blog
Every website needs a blog. This is where you share informative content about your business and product niche.
Blog content is ideal for targeting customers at the beginning stages of their customer journey. These customers may not be aware of your brand or don’t know that there’s a product out there that can solve their problem.
Stuck for blog ideas?
This video explains how you can find the best topics for your blog.
Every Shopify store comes with a blog with the default title “News”. We suggest changing the name to something other than news, even if you just change it to “Blog”.
Blog implies you will learn something new, whereas news suggests you will just get company updates.
To set up a Shopify blog:
- Head to “Shopify Admin”, then “Settings” and navigate to “Apps and Sales Channels”.
- Click “Online Store”, then “Open Sales Channel”.
- Click “Blog Posts” and then “Create Blog Post”.
- Enter your title and content into the relevant fields
- Open the blog drop-down menu, and select “Create a New Blog” in the “Organisation” section.
- Add your title to the “Blog Title” field
- Click save.
Once you’ve set up your Shopify blog, you can add new blog posts by clicking “Manage Blogs” then “Add Blog” on the “Blog Posts” page, then follow the same steps as above.
Shopify blogs, like product pages, have a search engine listing section. You can use this to add a page title and meta description.
If you have an external blog, you can link to it from your Shopify store’s navigation. We recommend keeping your blog on the Shopify platform to help boost the SEO and traffic of your entire store.
Content Writing
Content appears on every page of your website. It comes in the form of:
- Homepage content
- Category pages
- Product pages
- Shopify blog
The content on your Shopify store is an important SEO element.
It can be tempting to stuff as many keywords as possible onto every website page. Don’t do that. Please.
Google’s algorithms have evolved to notice when a website has useless content that doesn’t help searchers. They want to give users high-quality, helpful content that answers their search queries.
Step 1. Competitor Research
Next, type your keywords into Google and look at the results. Who are your organic competitors in the search results? What type of content is ranking for this keyword? Visit these pages and take notes of the type of content they have used.
For example, if it’s a product page, look at the information they’ve included. You might want to do the same if they have used bullet points followed by a description.
Step 2. Outline
Once you’ve decided how your content should look, you need to create an outline.
Open up your favourite word processor and add:
- Your title as an H1 tag
- Headings you want to use in H2
- Any subheadings in H3.
This will make writing your content much easier. Revisit the search results and take inspiration from headings competitors have used.
Step 3. Writing
Next up is writing.
You should only write as much or as little as you need to get your point across. Again, take inspiration from your competitors.
Different pages will need different amounts of content. If you find yourself writing a lot of copy for a category page, think about how you could use that for a blog instead.
Include your keywords throughout your content, but don’t overdo it.
Step 4. Multimedia
Once your content is written, you will want to add pictures and videos.
Product pages especially need lots of images. Even better if you can show off your product in a video too. Images on category pages should accurately represent the products included in that category.
You should use images and videos throughout your blog content to make it more engaging for the reader.
Where Do I Start With Content?
If you’re unsure about which topics to write about, start with this video on which content works best for each stage of the sales funnel.
We’re experts in writing content that ranks high on Google. Writing high-quality content is one of the best ways to get your Shopify store ranking on Google.
We’ve written a whole book on how to get your content (and website) to rank at the top of Google, which you can download for free below.
Is your marketing underperforming?
Request a free website and marketing review and our team will tell you how to improve your marketing.
How to do Technical Shopify SEO

Technical SEO refers to the SEO changes you make behind the scenes on your website that can help Google discover your website more easily. It can also improve the overall user experience.
Technical SEO Jargon
A few technical SEO terms can only be explained using jargon, so take a look at the list below to familiarise yourself with any new terms.
- Crawling – the process Google uses to collect content from around the internet. When a “crawler” reaches your website, it uses internal links and navigation to crawl your entire website.
- Indexing – the process Google uses to store and categorise information and content on websites to add them to search results.
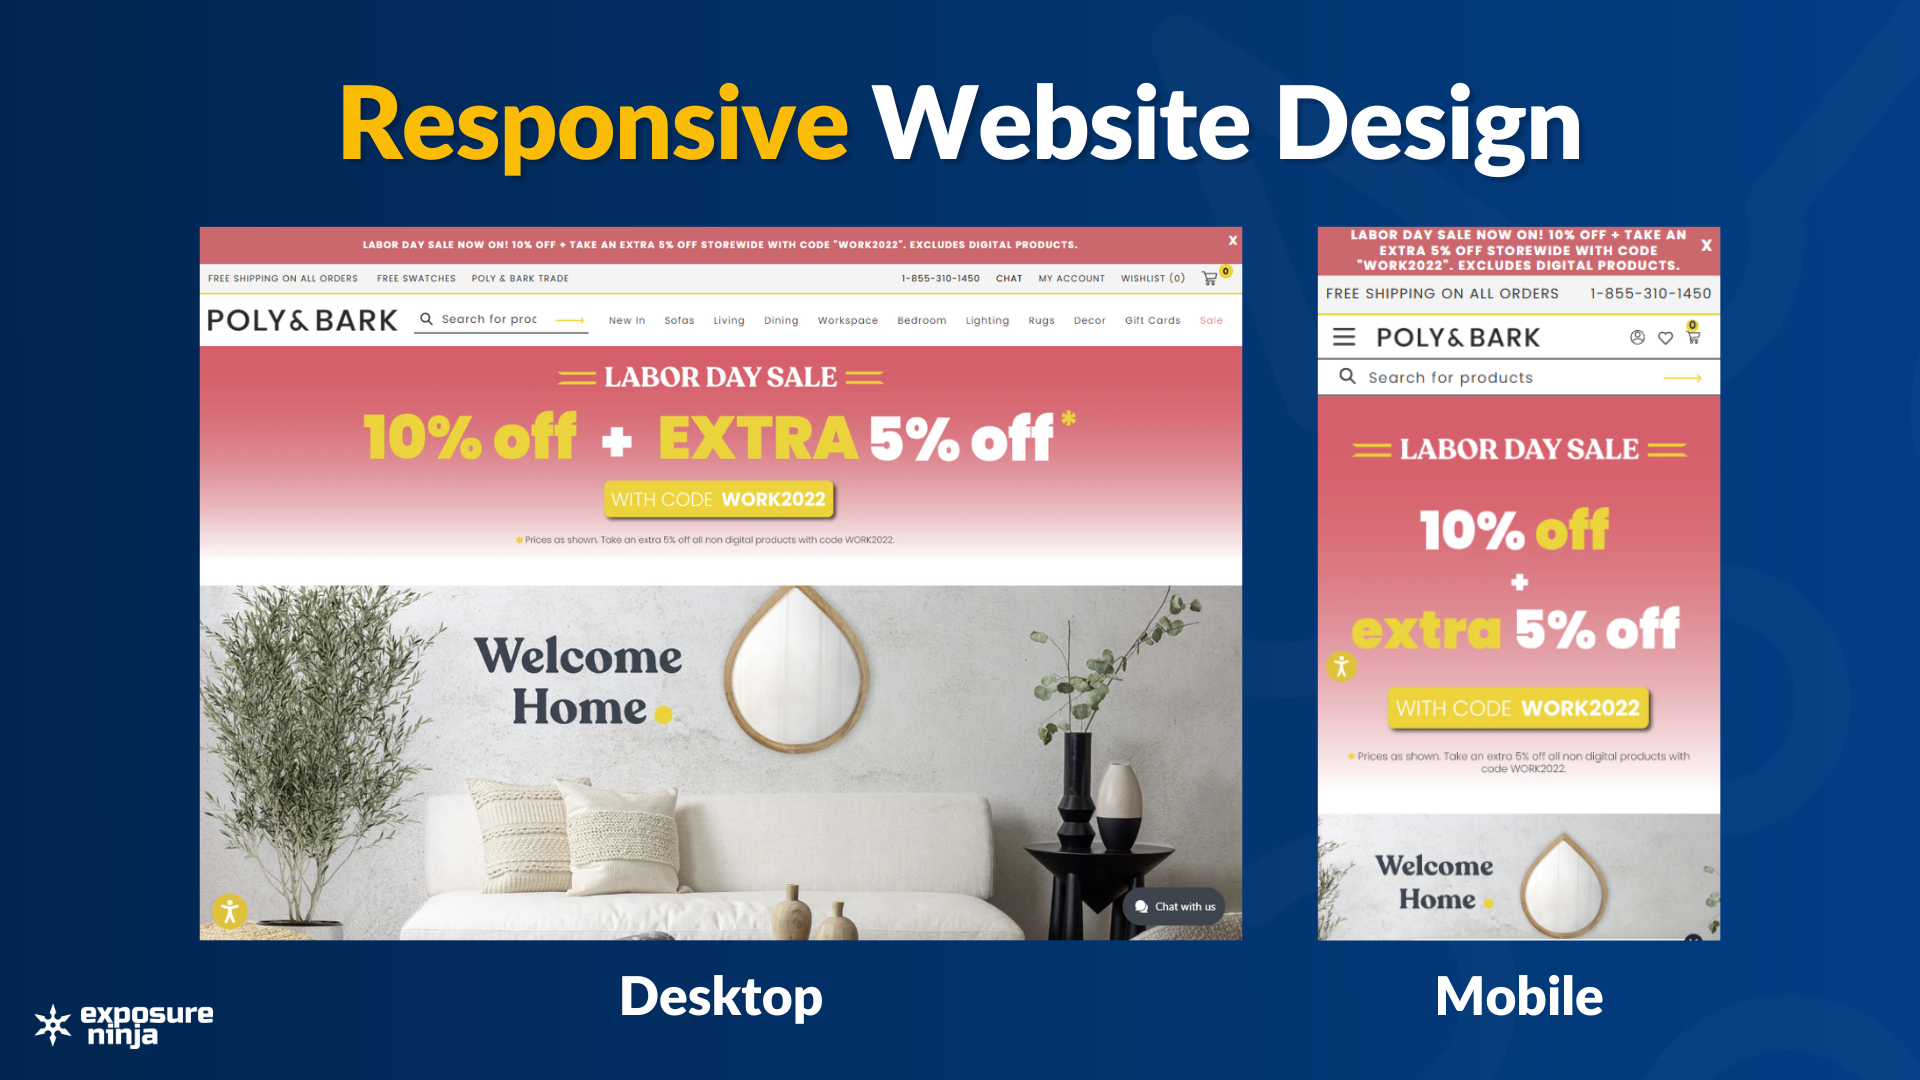
Optimise Your Shopify Store for Mobile
Let’s start with optimising your Shopify store for mobile.
Why?
Firstly, a large majority of Shopify’s 7.1 billion visitors browse from a mobile device, and 66% of orders on Shopify merchant’s shops complete on mobile.
Secondly, even if most of your Shopify traffic comes from a desktop, Google takes a mobile-first indexing approach. This means that they use your mobile site to crawl and rank your website, so you want to ensure it performs just as well as your mobile site.
All Shopify themes are mobile responsive, meaning they adjust to fit phone screens in a more natural way for mobile users. They also adjust to different monitor sizes or tablet screens.
One way to optimise your website for mobile is by using Accelerated Mobile Pages (AMP).
AMP is a framework created to help website owners build mobile-friendly websites. Their goal is to create the best mobile experience for mobile users.
It encourages the removal of anything that might be slowing your website down behind the scenes, such as unnecessary code or poorly optimised media.
Using an AMP app, you can easily optimise your Shopify store for mobile. Google suggests AMP by Shop Sheriff.
Test Your Shopify Store’s Speed
You can use Google’s PageSpeed Insights tool to test your website’s speed on both mobile and desktop. If your website is slow, it could be due to:
- Poorly optimised images and videos
- Excess code from apps you no longer use
- Unused code from JavaScript and CSS.
You can fix these using an AMP app. If you prefer to make the changes manually, you can use a website like TinyPng to compress images before uploading them and remove Shopify apps you no longer use.
You can also remove the unused code from your Shopify store if you have the skills. If you don’t have the skills, use an AMP app or speak to a developer.
All you need to do to check your website’s speed is to enter your URL into the PageSpeed Insights tool. It can take a few minutes to return your results, depending on how many pages your website has.

Structured Data in Shopify
When a user makes a Google search, some of the results may include more information than others. It might include a rating, a price, or more. These results are called “rich results” or “rich snippets”. The data you add to your website for these elements to appear in search is called schema.

A couple of ways you can make it more likely that your pages will appear in search results as a rich snippet include:
- Adding schema to your site manually.
- Using a Shopify app.
Plenty of apps on the Shopify app store can help you add schema to your store hassle-free. Some all-in-one SEO apps can also help you add structured data to your Shopify store.
If you want to manually add structured data to your Shopify store, you need to have experience with Shopify Liquid, JSON-LD, HTML and schema.
Duplicate Content in Shopify
Duplicate content is where more than one page shares near-identical content. Duplicate content is a common problem in Shopify stores, especially if you have a product that comes in a few variants, for example, different colours or patterns.
Let’s take some trainers. They’re available in six colours.
You have a product page for each colour, but (understandably), the product description for each is identical. Google then crawls these pages and doesn’t know which of these pages you want to rank in search results.
To avoid duplicate content issues, you can instruct Google to canonicalise all the other variants back to just one of the six colours. You can add a canonical URL to the page you want to rank.
Content King created a detailed guide on how to avoid and fix duplicate content.
Is your marketing underperforming?
Request a free website and marketing review and our team will tell you how to improve your marketing.
Submit Your Sitemap to Google
Your sitemap is a file called sitemap.xml that contains links to everything on your Shopify store. Shopify automatically creates this file when you set up your store.
Search engines use your sitemap to index the pages of your website, helping them appear in search results. You can submit a sitemap in Google Search Console to help Google index your Shopify store faster. This is useful if you have made changes to your website’s structure or if your website has just launched.
If you’re on a Shopify Basic plan, Shopify will only generate a sitemap file for your store’s primary domain.
If you’re on the Shopify, Advanced Shopify, or Shopify Plus plan, you can create sitemaps for any international domains you may have.
You can find your sitemap in the root directory of your Shopify store’s domain. To find it easily, type the URL of your Shopify store into your browser and add /sitemap.xml to the end of it.
For example, if you type “gymshark.com/sitemap.xml”, you can view Gymshark’s sitemap.

Once you’ve found it, follow these steps to submit your sitemap to Google Search Console:
- Open Google Search Console and click the three horizontal bars (≡) in the top left corner to open the menu.
- Open the “Index” drop-down if it’s not already open and select “Sitemaps”.
- Enter your sitemap’s URL into the “Add a new sitemap” box and click “submit”.
It can take Google some time to crawl your site, but it should be faster than if you didn’t submit a sitemap.
Set Up URL Redirects in Shopify
URL redirects are used to direct traffic from one page to another. You will need to set up URL redirects if you change an URL on your Shopify store so customers can find what they are looking for.
If you discontinue a product, you can set up a redirect to take visitors to a similar product — if they enter the original URL or click the URL on another site.
To create a URL redirect in Shopify, follow these steps:
- Open the “Settings” page via your Shopify Admin page, and open “Apps and Sales Channels”.
- Click “Online Store” and select “Open Sales Channel”, followed by “Navigation”.
- Select “URL Redirects” and click “Create URL Redirect”.
- In the “Redirect From” box, add the old URL that you want to redirect visitors from.
- In the “Redirect To” box, add the URL that you want to send visitors to. If you just want them to be redirected to your homepage, enter a “/” in the box.

If you have a lot of URL redirects, you can manage them in several ways:
- Using filters to categorise your URL redirects
- Edit URL redirects
- Import or export URL redirects
- Delete URL redirects.
Edit the Robots.txt File in Shopify
The robots.txt file on your Shopify store tells search engine bots, also known as crawlers, which pages they should view on your store.
Shopify stores have a default robots.txt file that’s optimised for SEO, but you might want to make changes to:
- Allow or disallow specific URLs from being crawled
- Add crawl-delay rules for specific crawlers
- Add extra sitemap URLs
- Block certain crawlers.
You can edit the robots.txt file using the robots.txt.liquid theme template.
Note: incorrect use of the editing feature can cause damage to your website, potentially losing all traffic to your site. If you make a mistake, Shopify states that their support team can’t help with robots.txt edits. If you need someone to edit your robots.txt file, contact our web development team.
Is your marketing underperforming?
Request a free website and marketing review and our team will tell you how to improve your marketing.
Off-site Shopify SEO

You can do a lot on your Shopify store to improve your SEO, but there are also some strategies you can use elsewhere on the web to help you rank higher on search.
Off-site SEO includes:
- Backlinking
- Guest Posting
- Brand Mentions
- Social Media.
Link Building for Shopify
Link building is an integral part of SEO. You build links through backlinking and internal linking.
Backlinks are links on other websites that point toward your website. They’re the links you need to help your site gain authority on Google. The more links you have from authoritative websites, the higher you’ll rank on Google. Backlinks can also help you get referral traffic from other websites.
Internal links are links on your website that point to other pages on your website. Internal links help visitors navigate your site. They also help Google understand which pages are related to one another.
How to Build Backlinks to Your Shopify Store
Create Great Content
The content that is most likely to get backlinks is long-form, detailed pieces that offer expert insight or opinion. This content should provide value, whether that’s new information or old information conveyed in a new way.
It’s easier to get backlinks to a well-written blog than to get a link to a product page unless your product is ground-breaking.
Start by researching the websites you’d like to be featured on. Look at the content they post – what’s their tone of voice? Do they link back to other websites and blogs in your niche? What do they write about?
This research will give you an insight into the type of content you should be creating to get backlinks.
Examples of content likely to get backlinks are:
- How-to content
- In-depth guides
- Studies
- Tools and calculators.
Research Competitor Backlinks
Use a backlinking tool, such as SEMrush* (which you can try free for 30 days using our exclusive partner link), to find out which websites are linking to your competitors.
Look at the content that’s being linked to and create something better. Then, reach out to the content writers linking to your competitors, and offer your content as a better alternative.
Guest Posting
Guest posting is when you write content for another website.
To get started with guest posting, list all the online publications in your industry.
Take a look at the type of topics they cover and what they deem to be “newsworthy”.
For example:
- Future thinking publication Futurism published a story about gaming tech brand Razer discussing Razer’s environmental initiatives.
- Beauty blog Byrdie featured the founder of fragrance brand Ulio & Jack in an article about solid cologne.
Think about what you can add to their website:
- What expertise can you offer?
- Is there content missing from their website that you’re an expert on?
It’s great to fit your products or brand into your writing, but you should focus on adding value to this publication while including a link to your Shopify store.
Some publications also offer sponsored content, where you can pay to have an article published with them.
Check their website to see if they have a page explaining their guest post policy. Fashion magazine Cosmopolitan has an in-depth guide explaining how to pitch a story to them.

Find Top Ten Lists
Many websites publish lists of the products that they think are the best. You can find these lists by typing “top” into Google, followed by your product.
If you sell vacuums, you’d type, “Top vacuums”. If you are a national company, you may want to include your location too, for example, “Top vacuums in the UK”.

Article screenshot from The Telegraph.
Read through these lists and see if your product is a good fit. If it is, reach out to the article’s writer and ask for your product to be included. Ensure you include your product’s USPs and explain why it deserves to be on that list.
You can also look for more general lists that fit your brand, such as “Top 10 Stocking Fillers” or “Top Father’s Day Gifts”.
Brand Mentions
Brand mentions are when a writer mentions your brand or product but doesn’t link back to your website.
There are a few ways you can find brand mentions online. Once you’ve found them, you can reach out to the writer and ask for a link back to your site. It could be that they simply forgot to link and won’t mind linking back to you.
Google Alerts
The first way to find brand mentions online is by setting up a Google alert for your business name or product names. This is more challenging if your business name is a commonly used word.
You can choose how often you want to receive email alerts from Google.

SEMrush Brand Monitoring
SEMrush* offers a brand monitoring tool. You can track mentions of your brand name or specific products, similar to Google alerts.
SEMrush offers more specific data related to each mention, including whether or not the comment was positive or negative, how many mentions have backlinks, how much reach you could be getting from these mentions and more.

Brand Mentions
Brand Mentions is a software dedicated to finding mentions of your brand online. Their tool includes brand monitoring, reputation management, competitor tracking and social media monitoring.

More ways to get backlinks to your Shopify store
Check out this video for more ways to get backlinks to your store.
Pitch your content
To get backlinks to your Shopify store, you need to reach out to writers and editors on the websites you want to link to you and ask them for a link.
Of course, you don’t just email them saying, “link please!”
Here are some best practices for writing outreach emails.
- Keep your pitch short, less than 150 words if possible.
- Fill out your signature, including your job title and a link to your website.
- Include your experience and why you are knowledgeable on the subject. This will help establish your credibility and why you’re in a position to help.
- Make your emails personal and send them to individuals, not a shared inbox.
- If you can’t find an editor’s email address on the website, use social media, like Twitter or LinkedIn, to see if they shared their email address there. If not, you can use a tool like Hunter.io to find email addresses.
Regarding guest post outreach, it’s best to have a few topics to pitch to the publication rather than asking them what you should write. Look at their current content and come up with multiple topics you can write about with authority related to your business.
Add Internal Links to Your Shopify Store
Internal links help Google understand which pages are related to each other. It also helps users navigate your store and allows them the opportunity to learn more about your products and business.
Adding internal links to your Shopify store is fairly easy.
Each time you add a new piece of content to your site, think about which content and pages on your Shopify store you can link to.
It could be a related product or a blog explaining more about a topic. Think about how you can link to this new content from old content on your site.
Is your marketing underperforming?
Request a free website and marketing review and our team will tell you how to improve your marketing.
Social Media
You can build a presence on social media to build your brand’s online presence and drive more traffic to your site. A steady traffic flow to your site helps boost your website’s overall ranking.
You can do this by:
- Sharing relatable content related to your niche, business and products
- Share informative content related to your niche, business and products
- Share behind-the-scenes content
- Hosting giveaways and competitions
- Connecting with your audience through comments and direct messaging
- Sharing links to your website content
- Sharing product shots and videos
- Encouraging user-generated content.
The social media channels you choose to use will depend on your demographics. Instead of trying to reach everyone on all social media platforms, start with one or two where you know your audience is spending their time.
Once you’ve mastered those platforms, consider branching out to other platforms, but only if your demographic is spending their time there. If they’re not, your time is likely spent better elsewhere.

Do some research into the platforms your competitors are posting to and the type of content they post. You should also look at eCommerce businesses outside of your niche for inspiration.
Should I Hire a Shopify SEO Agency?

If you’re busy running your store and don’t have time to do your own SEO or simply want to focus on other parts of your business, you can hire an SEO agency to do SEO for you.
An SEO agency will advise you on best practice SEO for your Shopify store, help you to set up a theme and customise your design.
When picking an SEO agency to help with Shopify SEO, you need to consider the following things:
- Is the agency a Shopify Partner?
- Can they show you reviews?
- Can they show you results from previous SEO campaigns?
What’s Next?
Shopify SEO is easier than it sounds, but it does take time for you to see results.
- Start by improving your on-page SEO so that you can start ranking higher in those search results.
- Next, improve your technical SEO by making adjustments behind the scenes of your Shopify store.
- Finally, improve your off-site SEO by using social media and building backlinks.
You should keep on-page and off-site SEO in mind with every new piece of content you add to your website. Revisit your technical SEO every few months to ensure you’re still following best practices.
If you’re unsure which areas of your Shopify store could benefit the most from SEO, why not request one of our website and marketing reviews? It’s totally free, and you’ll get a 15-minute video explaining the areas on your website that need improving.
What to Read Next
- Everything you need to know about Shopify SEO
- PPC Guide for Shopify eCommerce Stores
- How to Create a Winning Shopify Marketing Strategy.
*Some links within this article are affiliate links which Thinkplus receives a fee for promoting (these links are not sponsored). Thinkplus only promotes services we already use within our marketing stack.